In this article
- Project issues
- How to create and track project issues
- Updating an issue
- Commenting on an issue
- Resolving an issue
- Reopening an issue
- Want to know more?
Project issues
The issues functionality within Chalkstring enables the storing of data relevant to the things which matter most to your business.
An issue is a description of something, supported by text, audio or images, which can be assigned to different people within a project and the resolution of the issue tracked for audit purposes.
For example, snagging picked up on a progress walk round, allocated to the sub-contractor responsible and dates set by which it must be resolved.
How to create and track project issues
- Expand the main Chalkstring black menu bar and click on the ‘Projects’ menu.
- Search for and click the 'Project' to add the variation to.
- Within the project homepage, click ‘Project hub’ sub menu.
- From the ‘Project Hub’ page, expand the blue menu bar and click ‘Issues'.
A list of all the issues reported for this project to date will be displayed. The table data can be searched and filtered.
New issues can be added to this list from three locations within Chalkstring.
- From the 'Progress' section when updating progress sliders.
- Directly in the issues list.
- From the 'Takeoff' section in the 'Markup' submenu.
5. Within the issues list, click ‘+New Issue’.
6. Complete the form.
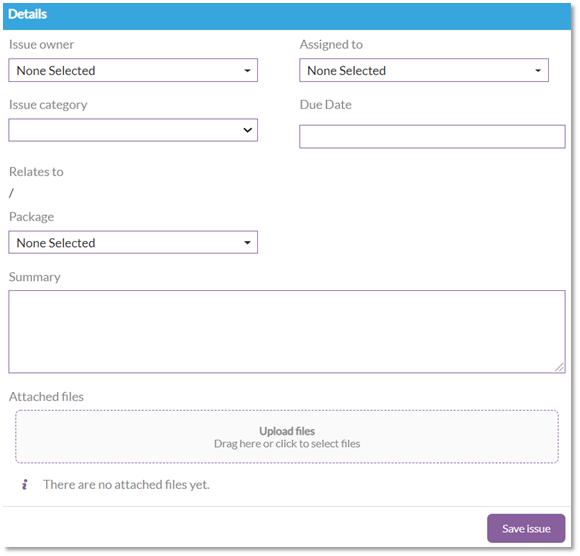
- Issue Owner - This is whoever is going to be responsible for overseeing the resolution of the issue.
- Assigned to- This is whoever needs to action the resolution.
- Issue category - This is a drop-down list of the categories from the ‘Issue category’ area of the ‘Admin’ section of Chalkstring. Select the category to suit the issue being logged.
- Due date - This is the date this issue must be actioned by.
- Package– Click here to select from a drop-down which package and location the issue relates to.
- Summary – Enter a descriptive summary of the issue.
- Attached Files – Use this to attach documents, images, audio files, correspondence etc that relate to the issue and will help others to understand and resolve the issue.
7. Click ‘Save Issue’.
The process for creation of an issue is the same if completed by clicking the ‘Log Issue’ button from the ‘Progress’ section of Chalkstring.
Issues can also be logged from your drawings in the 'Takeoff' section of Chalkstring.
Updating an issue
- Search for and click on the issue to be updated.
- Click the ‘Edit Issue’ button.
- Make any required changes.
- Click ‘Save Issue’.
Commenting on an issue
- Search for and click on the relevant issue.
- Enter the details in the comments box
- Click ‘Leave Comment’.
A comment can also be added on the edit issue page.
Comments are stored with user and date details.
Resolving an issue
- Search for and click on the relevant issue.
- Click the ‘Resolve this Issue’ button.
Reopening an issue
- Search for and click on the issue to be reopened.
- Click the ‘Reopen this Issue’ button.
