In this article
- Importing client bills
- Video: Importing client bill data - best practice
-
How to generate a Chalkstring bill import template
- How to a format a 3rd party bill
- How to copy 3rd party bill data into the Chalkstring 'Import Template'.
- How to import a completed Chalkstring import template
- Want to know more?
This article covers the manual method of updating client bills so they can be imported via the Chalkstring formatted bill spreadsheet. For details on how to import directly from client bills, see article 'Client bill import'.
Importing client bills
You can import 3rd party bill data and automatically populate the rate build-up and bill of quantities ready for pricing and/or zoning. This helps you to create estimates faster and removes the need for you to create data manually. You can also produce documentation that mirrors your client’s bill format and naming conventions.
If the package assessment being created is already defined in an electronic format, either something produced by a client, a subcontractor, a PQS or the ultimate project developer, this data can be used to set up the project in Chalkstring. Note, to import this data, you will need to use the Chalkstring pre-formatted template.
Note: The bill importer should only be used on an empty assessment, where the rate build-up and bill of quantities have not had any products or zones already added.
Importing client bills - best practice
- The workflow (1:27)
- How to download the client bill template (2:45)
- Understanding the client bill template (3:25)
- How to reformat your original bill (4:35)
- How to populate the client bill template (8:27)
- Top tips (9:00)
- How to import the client bill template (9:45)
- Understanding the rate build-up (11:05)
- Structuring the bill of quantities (14:35)
- How to add a single zone (15:12)
- How to add multiple zones (15:48)
- How to add a sub zone (16:45)
- How to move, clone, edit and delete zones (17:28)
- Real-life examples (18:02)
- How to add quantities (22:40)
- Colour coding in the bill of quantities (24:32)
- Assessment actions (26:23)
How to generate a Chalkstring bill import template
- Expand the main Chalkstring black menu bar and click on the ‘Projects’ menu.
- Search for and click the 'Project' for the bill to be imported.
- Click on the work package for the tender.
- On the assessment homepage, click the assessment version where the bill will be imported.
- Click on the ‘Assessment Overview’ sub-menu.
- Click the ‘Assessment Actions’ button in the top right corner.
- Click ‘Download Bill Template’.
- Open the spreadsheet once it’s downloaded within your internet browser.
How to format a 3rd party bill for importing
1. This process will need to be undertaken externally to Chalkstring to ensure the 3rd party data is in a suitable format for bulk importing. As client and subcontractor bills can be defined in any format, it may not always be as simple as just copy and pasting the entire columns from your 3rd party document straight into the Chalkstring Import template.
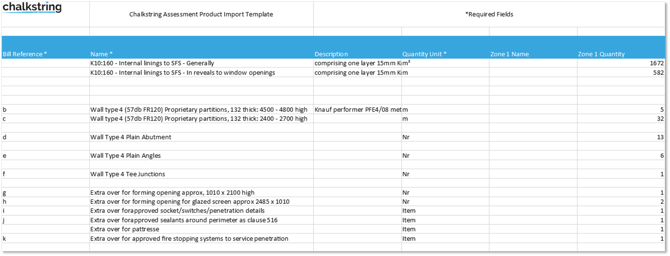
Any field with an * is a required field. These columns must be completed for the spreadsheet to import into Chalkstring. If existing quantities or take off measures are being imported, at least one quantity in the Zone 1 field will need to be completed.
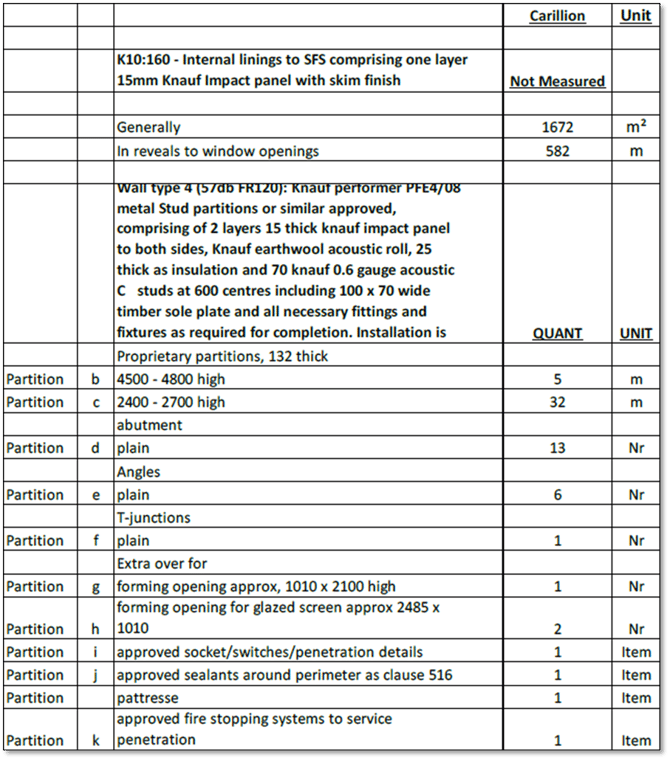
Below is an example of a received 3rd party bill format and how this data can be updated and pasted into the Chalkstring import template ready for importing into Chalkstring.
Received 3rd party bill
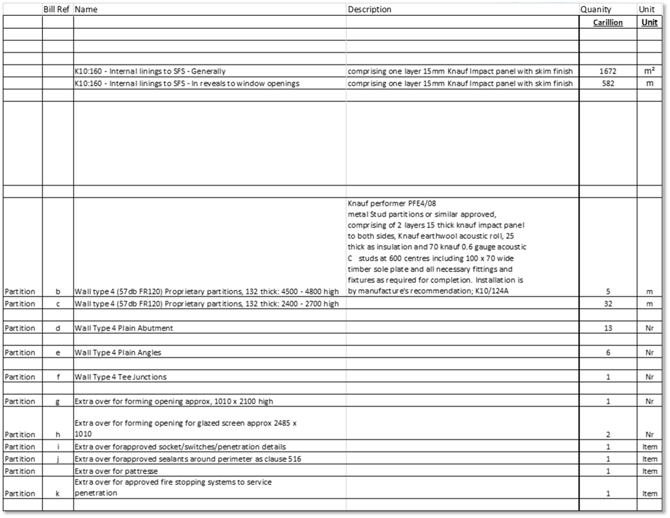
Once the data has been updated and reformatted as required, the data can be copied and pasted into the Chalkstring import template.
How to copy 3rd party bill data into the Chalkstring 'Import Template'.
- Columns of data from the amended 3rd party document can be copied and pasted into the import template.
- Highlight and copy the column of data from the 3rd party bill that is to be pasted into the import template document.
- On the import template, select the relevant corresponding column and cell that the data will be pasted into. Paste the text/values only without any formatting etc.
- Repeat for each required column in the import template.
- Double check that all the cells and rows have aligned correctly and accurately reflect the data that has been copied. The data, including spaces, should be the same as what was copied but now be on the Chalkstring import template.
How to import a completed Chalkstring import template
- Once all the data needing to be imported has been transferred to the template document, save a copy locally as an Excel workbook.
- After navigating to the relevant assessment overview page as required, click ‘Assessment Actions’ in the top right corner.
- Click ‘Import Client Bill Template’.
- Click ‘Choose file’ and browse to the file to be imported.
- Click ‘Import’.
The first time a bill is imported, a product called 'Client Bill Import Entity' will be created in the product template database. This template is created to allow the imported products to be sync'd with the database when required.
If the import process fails, a list of the issues Chalkstring experienced when trying to import the document will be displayed. These will need to be corrected before you import the document again.
A successful import process will result in the following
The rate build-up:
Each unique product row in the import template will have been created as a 'shell product entity' with the same name, description and unit of measurement defined. Each of these products will be red-flagged as requiring further information to be clarified. The products will only consist of a name, a unit of measure and quantities in the bill of quantities. The actual requirements of the products will not have been defined beyond a text description.
These empty products can be replaced with a product from the product template library that matches the requirements. To do this:
- Click the menu button for the product on the right side of the page and click “Replace Product”.
When a product is replaced this way, the products become linked and the underlying details of what is involved with delivering the requirement are automatically added. This process retains the name and description details as were imported, along with the quantities, and automatically populates the content of the scope requirements from the product database.
For example, the client bill import results in an empty product called Wall Type 1 with a detailed description about the product. Searching for and replacing a product in the product template library with a product matching this description, or something similar will ensure the 2 products are linked. Chalkstring will then know the specific allowances of everything that will be required.
If there are no products in the database which reflect the imported requirements, a new product template can be added by clicking the ‘+ New Product Template’ button from the replace product page.
The bill of quantities:
For each unique product row, depending on the zone columns that were given names and quantities in the import document, Chalkstring will automatically create the bill of quantities zones and populate the measures. These should be checked to confirm that the way the zones were defined from the import process is sufficient for the purposes of the project.
Often 3rd party bills will present a total project quantity and not break that down. These quantities can be split into defined zones such as buildings, floor levels and plots etc.
The bill of quantities contains coloured flags to highlight the source of the quantity in each product for each zone.
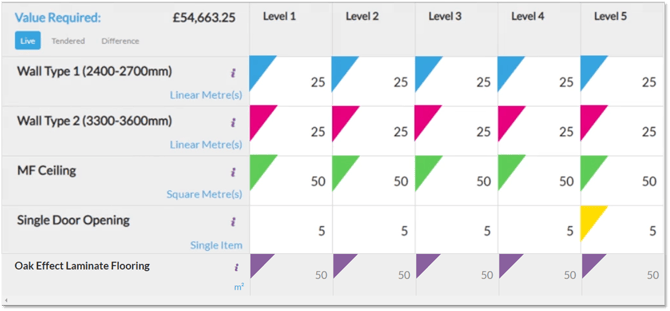
- White cell = No quantity or quantity has been entered manually.
- Blue = The quantities have been populated from a drawing from the takeoff section of Chalkstring.
- Dark Pink = The quantities have been populated by using the client bill import.
- Green = The quantities have been populated by using export import feature on the bill of quantities page.
- Yellow = The quantities have been populated as a result of changing the on-site remeasure via the progress slider in the progress section of Chalkstring.
- Red = There is currently a discrepancy between the quantity shown in the bill of quantities and what is saved in the takeoff drawing.
- Purple = The quantities have been populated by linking this product to another. The 'parent' product automatically populates the quantity for any linked product
