In this article
- Logging progress
- Takeoff progress
- Logging progress on drawings (Takeoff Progress)
- Want to know more?
Logging progress
Once a project is onsite, one of the key activities that will be undertaken on a regular basis is updating site progress. This is essential so you can benchmark your incurred costs, establish your current application revenues and provide your clients with a detailed report of progress by package and zone, all of which can be compared against the programme time duration.
Chalkstring links key onsite functionality together through progress. Log progress from a mobile device whilst onsite by using your takeoff drawings, sliders with all the calculations taking place in the background. Chalkstring will even automatically calculate your material onsite, by comparing your current progress vs what you have ordered to date.
At the start of each project package, in respect of measured works, you need to decide whether you wish to:
- Update progress of all products individually (Progress by product) - This gives maximum accuracy and is recommended for lower volume / higher value workloads.
- Update progress of all products via a small number of groups (Progress groups) – This gives maximum speed and is recommended for higher volume / lower value workloads.
- Update progress against the measures on your takeoff drawings (Takeoff progress) which were marked up during the tender phase.
Warning: Only one method can be used per product: either 'Takeoff Progress' or the slider-based 'Progress by product'.
Mixing them (for example starting progress in Takeoff then switching to sliders for the same product) is not supported.
Once you start recording progress using one of the methods, the other will become 'greyed' to prevent using the other method which would cause inconsistent results
Takeoff Progress
Takeoff Progress lets you update project progress visually using the drawings you uploaded and measured during tendering or while live on site. This method can be more accurate and visual than using the slider interface — especially where you want to show exactly which parts of a drawing have been completed.
Progress logged in Takeoff feeds into applications and labour data in the same way as updates made via the 'Progress by product' section.
Before using Takeoff Progress we assume:
-
you have added measures to the project using Takeoff, and
-
the project has been taken onsite (so progress can be logged).
If you haven’t already, we recommend watching the general Logging progress video for an overview of Chalkstring progress features.
Logging progress on drawings (Takeoff Progress)
Accessing the drawing
-
Open the project and choose Progress from the main blue menu.
-
On the Progress screen, switch to the Takeoff Progress tab (this will display all drawings that have been added to the project).
-
The drawing list shows: drawing name, package, linked zones, uploaded date, last modified date and current progress status (colour coded).
-
Red — 0% (no progress)
-
Orange — partial progress
-
Green — 100% (complete)

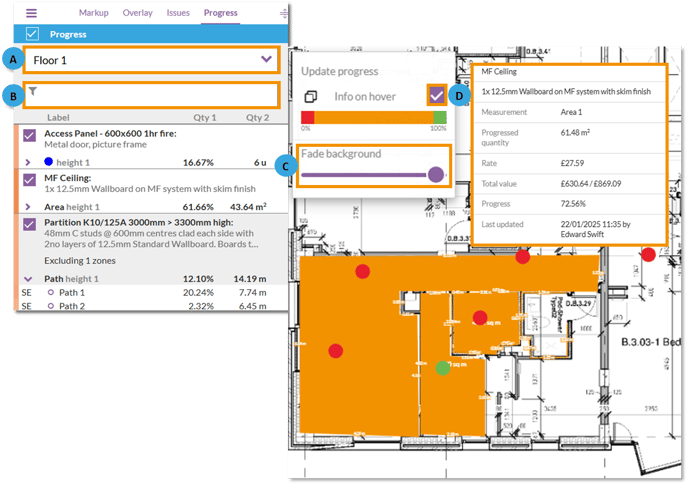
The takeoff progress page
-
Click the drawing you want to work on — this opens a view similar to the Takeoff measurement screen, with a Progress tab selected.
-
A. Choose the zone you want to mark progress against from the dropdown.
-
B. Use the filter field to display specific products and hide any products you don’t want to see using the checkboxes next to each product.
- C. The Fade background slider will fade the background drawing to make the measure easier to distinguish.
- D. The 'Info on hover' will display final information when hovering your cursor over a measure.
Marking progress
1. To start marking progress, click on the measure you want to mark progress against on the drawing or click on the measure in the left hand menu bar.

A pop-up will appear, allowing you to mark progress for the measures.
To do this:
-
Select the component you want to update from the left-hand menu.
-
Use your mouse or finger to fill in the measure by clicking and dragging (or touching and dragging) over it.
You can mark progress using three measure types depending on how the product was measured originally:
-
Area measures — draw a box around the progressed area to mark it as complete.
Use when products were measured in m² or areas. -
Linear measures (Path)— colour in the progressed length on the drawing.
Use when the product uses linear measures (LM). -
Count measures (Single items) — tick off individual items as complete.
Use for count-based products (e.g. doors, housings, items that are counted rather than measured by area or length).
As you mark progress, the marked area will be coloured green on the measures to show which parts have progress marked against them.
- Green = Progress marked
- Red = No progress marked
The corresponding component bars on the left will update to reflect your changes.

2. Menu button - Displays options to move between products and zones.
3. Measure select - Displays options to move between measures for the selected product.
4. Components - The left-hand menu shows each component of the selected product and its current progress.
- Click to to select which component to mark progress for.
- As you mark areas on the drawing, the component progress bars increase accordingly.
- Progress is measured per component — if you add progress for one component it won’t automatically change another unless you mark it too.
5. Drawing options - Drawing menu with various options when marking progress:
- Forward & back arrows - Move between selected components.
- Compass icon - Switches to allow you to move around the background drawing (Tablet use).
- Arrow icon - Switches to allow you to mark progress on the drawing.
- Free/Ortho (Area measures only) - Switch between free measure marking, or snapping to vertical, horizonal and diagonal lines (Ortho).
- Plus & Minus buttons - Changes between adding progress or removing it.
- Left and right arrows - Undo or redo the last change made.
Saving marked progress
-
If you make a mistake while marking progress, click Cancel at any time — this will discard the unsaved progress changes.
-
When you are happy with the recorded progress for the current product, click Save (bottom right).
-
Remember to click Save after marking progress for the current product; progress must be saved before moving to the next, cancelling will discard changes.
Want to know more?
