In this article
- Product templates
- How to create a new supply & fit product template
- Using an existing product as a template for a new product
- Want to know more?
Product templates
Product Templates are the products or services that your business offers to your client as part of your measured works. These products are the items that will be included on your bill of quantities in both tenders and applications for payment.
We recommend all product templates are set up as self-delivered products. This will ensure its quicker and easier to switch between self-delivered products and supply & fit, as all the required information for self-delivery will be available. If setting up a product as a supply & fit only product, and this product is used for self-delivery, the materials and labour elements will then need to be completed.
How to create a new supply & fit product template
1. From the black menu click the 'Settings' icon, then click the 'Resources' icon.
2. Click the 'Product Template' sub menu.
3. Click ‘+ New Product Template’.
4. Complete the following fields.
- Product name - Enter a unique name for the product
Naming - best practice
- The product name can be used when searching the 'Product Templates' database.
- You may need to define and agree naming conventions for these internally to ensure they are both descriptive and accurate.
- This name becomes the default product name which displays on the 'Bill of Quantities', although this can be later changed in a specific project if required.
- Package - Define the work package(s) the product is typically associated with from the drop-down menu.
- Quantity Unit - Choose the unit that the product is defined in. This is determined by how you will be charging your client for delivering. The unit selected here will be identified on tenders and applications for payment.
- Product description - Add a detailed description of the product.
Description - best practice
- The description can be used when searching the 'Product Templates' database.
- The description provides additional information than the product name alone and should ideally reference performance criteria.
- The more detail you include in the description, the more accurately your users will be able to search for these products again within your database.
- The description will also display on your bill of quantities documents, however as with the name, the user can change it for project specific reasons if required.
- Pricing notes - is an optional field whereby assumptions that were made when putting the product together can clearly be identified. These are internal to the business and never appear on any output documents but will allow your site team to quickly identify where savings could potentially be made (e.g. if you have assumed a measure through basis but the project is net of openings).
- Resources - 'Documents & External Links' is an optional drop down field allowing you to save any relevant information alongside the product template. These could potentially be drawings, technical specifications, links to external websites, or even YouTube videos showing the approved installation or delivery process for the product.
Components
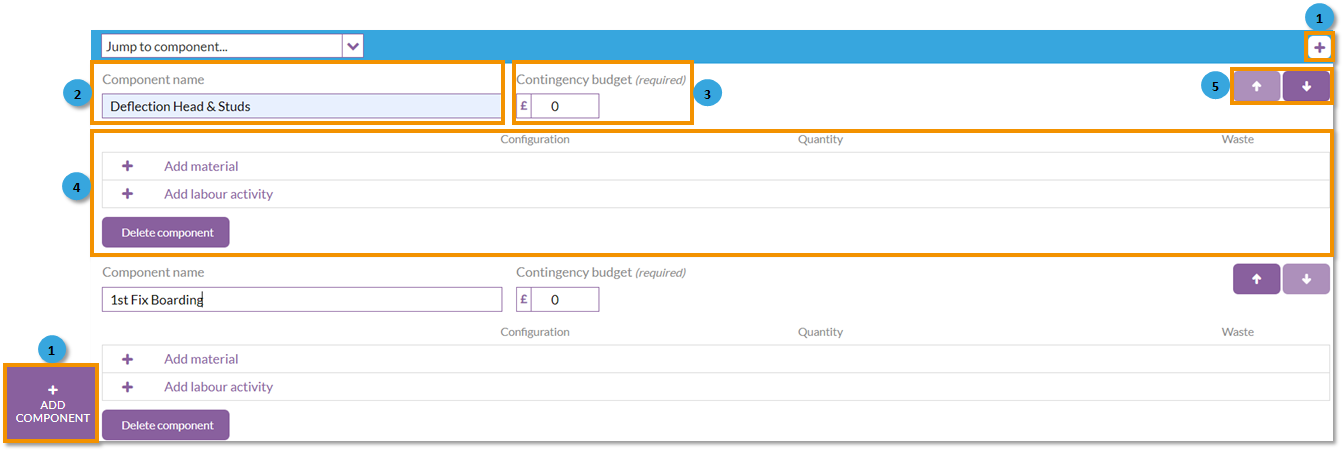
1. Add component - Every product has a minimum of one component as a default. To add more components to the product, click the ‘+ Add Component’ button.
2. Component name - The component requires a descriptive name e.g. 1st Fix Boarding as this name will be referenced for updating progress onsite.
3. Contingency budget - Allocate a contingency budget to cover the costs you expect to incur delivering this component that you are not going to specifically define in the product itself. This will cover sundry items such as PPE and fixings, as well as any allowance you want to make to cover unknown elements. Contingency budgets accumulate into a pot of money which can be used onsite to spend on items which have not been specifically allowed for in the defined scope of works.
4. Additional components - Continue to add components until you are happy the product has been set up in the way you would like your subcontractors to deliver it.
For example, if you require a stud partition wall to be delivered by your subcontractors, a typical product would consist of 'Deflection Head & Studs', '1st fix boarding', '2nd fix insulation & boarding' and 'Plastering' components.
5. Move components - When you have multiple components, the order of them can be rearranged by using the up and down arrows.
When happy with the product and component structure, click the ‘Save Product’ button. If the product does not save, scroll back up to check which bit of required information has been missed.
All required fields must be completed before the product template can be saved. Chalkstring will highlight red if something essential is missing at the point of saving. Also check the name you are using is unique in the database. There cannot be two different products with exactly the same name.
Using an existing product as a template for a new product
1. From the black menu click the 'Settings' icon, then click the 'Resources' icon.
2. Click the 'Product Template' sub menu.
3. Search for the product template you wish to amend.
4. To edit the product template click the ‘Edit’ icon in the top right corner.
Products can also be edited from within projects and if required, saved back to the product template database.
5. Make any required changes, such as adding, renaming, moving or deleting a component.
Chalkstring will only allow you to save as new if the name of the new product has been updated to something unique, and all required fields have been completed.
6. Once the required changes have been made, click ‘Save as New’ to save the changes as a brand new product template.
For details on editing, archiving or deleting product templates, see article 'Adding and editing product templates'.
Want to know more?
