How to generate outgoing applications for payment
In this article
Outgoing applications for payment
Applications for payment of work can be quickly and easily generated within Chalkstring. You can project forward and apply for the amount you want to be paid, regardless of the amount of work that has been completed to date. Your outgoing applications for payment represent the culmination of the entire Chalkstring process within each project.
Chalkstring provides several unique features when producing applications for payment, to maximise revenue and cash flow:
- It automates the application process with the click of a single button.
- A real time ‘If generated now’ calculator provides key summary data of the value of work you currently have in progress.
- The 'Application Bill' automatically populates with live progress data, enabling a full application to be generated with one click.
- The project forward functionality allows you to apply for more than the current progress level, e.g. if the application was to be submitted today, Chalkstring would allow you to project progress forward to a future date (e.g. month end) without affecting actual site progress.
- Chalkstring automatically reconciles materials ordered onsite, as it knows what has been ordered, actual work completed and calculates the difference. It produces a fully costed & quantified schedule of all materials onsite to supplement your application.
- Once the application is generated, it can be downloaded from Chalkstring into an Excel spreadsheet containing all the current application information, including tracked changes for any packages on re-measure, without the risk of formula errors.
- Payment certification tracking enables you to always know what has been applied for, what has been certified and when, and what remains outstanding.
Guidance: Before generating an application for payment, you should have:
- Added all contract and variation work in all relevant package assessments for the project.
- Ordered materials through Chalkstring.
- Updated progress through Chalkstring.
Considerations: Material onsite reconciliation is a fully automated process within Chalkstring, the only things you need to be aware of are:
- Anything ordered as a contingency cannot be automatically included in applications for payments. This is because Chalkstring cannot reference the products the contingency item is being used in, so cannot apply progress to them to work out the difference.
- A safeguard is built into Chalkstring to ensure the materials onsite can never be in a minus state, even if you have claimed for more progress than materials ordered.
- As a default, materials onsite are charged to clients at cost + 20%. The client will only see the net price.
- For details on changing the materials on site percentage, see article 'How to change the materials onsite settings'
Generating applications for payment
- Expand the main Chalkstring black menu bar and click on the ‘Projects’ menu.
- Search for and click the 'Project' required.
- Within the project homepage, click the ‘Project hub’ sub-menu.
- Expand the main Chalkstring blue menu bar and click ‘Applications’.
- You will taken to the ‘Application Bill’ page.

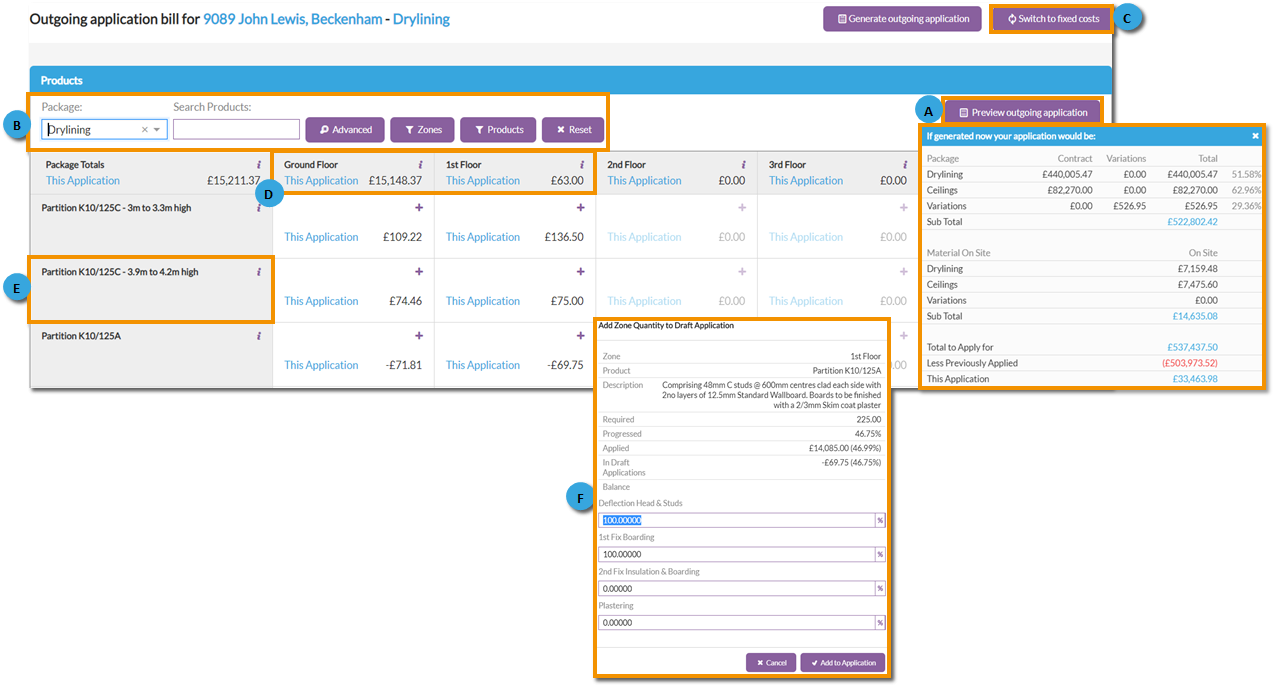
A - Preview outgoing application
- To view the current application as it stands, click on the 'Preview outgoing application' button.
- This breaks down the current live value of your work in progress and subtracts previously applied figures to give you the current figures for this application.
B - Filters
- Click on the ‘Package’ drop-down list to select a package.
- The 'Zones' filters can be used if you want to apply for work from specific zones.
- The application bill displays all products within a package, with their current progress levels ready for an application to be generated.
-
The search products filter can be used to find a specific product by name. Clicking advanced will provide additional advanced filter options. Clicking the 'Zones' or 'Products' filter buttons will allow filtering of the existing zones and products within application bill. Click the filter buttons, select the required products or zones you wish to view using the filters and click 'Apply selection' to apply your selected filters to the application bill.
To select multiple zones or products, hold the ctrl button on your keyboard when clicking each item to add them to the filter.
C - Switch to fixed costs/measured costs
- The application defaults to display information on measured costs from your 'Bill of Quantities' section, but this can be switched to show fixed costs from your 'Fixed Costs' section by clicking the' Switch to fixed costs' button. This button toggles between the two views.
D - Zone values
- Identifies the values for the current application by zone/subzone.
Click the 'i' button for for additional information.
E - Product details
- Identifies the values for the current application by product.
Click the 'i' button for for additional information.
F - Zone/product progress details
- Clicking the '+' icon for a product and zone will display the rate, quantity required, zone value, current progress and what has been applied to date.
Projecting forward
If you want to project forward, e.g. if the application was to be submitted today, but you want to project forward to a future date (e.g. month end) and apply for a higher value.
- Use the buttons '+' for each of the sections and adjust the % being claimed for various components within the products.
- Click ‘Add to application’ to confirm, and this will result in the application being based on the adjusted figure (whilst all live onsite data remains related to the accurate progress metrics).
- Click the 'Preview outgoing application' button to view the current application breakdown.
- If you are satisfied with the figures, click ‘Generate outgoing application’ button to generate an application spreadsheet to send to your client.
- The applications will be stored in ‘Open outgoing applications’ with a ‘Held’ status.
- Select the application and click 'Download Application' button to download the spreadsheet and send to your client.
| How to allocate external costs to projects |