In this article
- Ordering fixed costs
- How to order fixed costs
- The fixed costs bill page
- The draft orders page
- The confirm order details page
- The order summary page
- The edit order page
- Want to know more?
Ordering fixed costs
Ordering fixed costs in Chalkstring is similar to placing an order on a website, using an online shopping basket. The only difference is, the orders created in Chalkstring can be placed with multiple suppliers or contractors simultaneously. As Chalkstring allows files to be exported, suppliers and contractors do not need to proactively engage with Chalkstring if they choose not to. Exported documents can be updated by suppliers or contractors and imported back into Chalkstring.
Fixed costs within Chalkstring are anything that are required to be costed into the projects and charged for by clients, but which are not directly related to measured works or do not naturally form part of bills of quantities.
These will primarily be items found in preliminaries sections of project contracts, such as management & supervision, plant and waste disposal allowances, accommodation and welfare facilities, statutory and utilities allowances, etc.
The ordering system is fully integrated with the supplier and contractor database and the accounts section of Chalkstring. This streamlines the entire process and reduces the risk of human error at any point in the process.
How to order fixed costs
- Expand the main Chalkstring black menu bar and click on the ‘Projects’ menu.
- Search for and click the 'Project' required.
- Within the project homepage, click ‘On site’ sub menu.
- Expand the main Chalkstring blue menu bar and click ‘Fixed Costs’.
- Using the ‘Package’ drop down, click on the package to be ordered from.
The fixed costs bill page
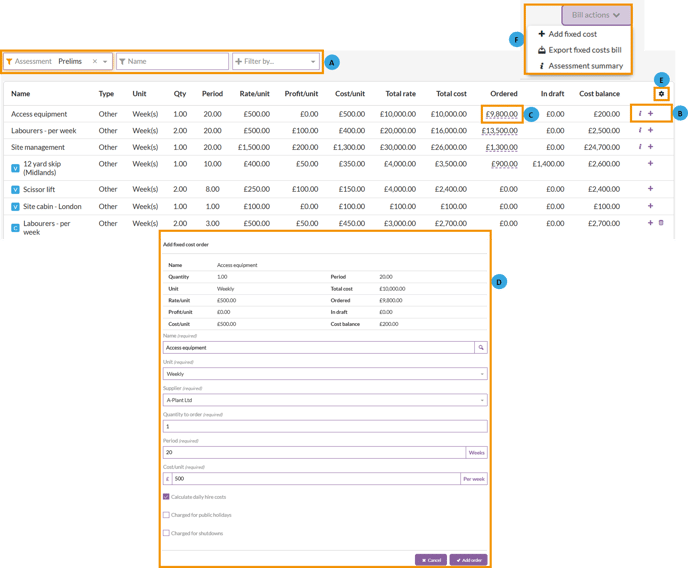
A. Filters
B. Option buttons
C. Ordered
- Summary - This displays a financial summary for this cost.
- Name – This will automatically default to the fixed cost name associated with the cost where the '+' button was clicked. You can change the name and use this costs budget to order any fixed cost you require.
- Unit – This will automatically default to the unit associated with the cost where the '+' button was clicked. You can change the unit if needed, for example, to order a different cost that uses a different unit than the one in this cost’s budget.
- Supplier - Select the supplier who you are ordering this cost from.
- Quantity - Enter the quantity of the cost required.
- Period - Enter the period the fixed cost is required for. For Lump sum units, this will default to 1.
- Cost/unit - Enter the cost for the fixed cost being ordered. This will default to the value shown in the summary at the top but can be changed if the cost is different.
- Calculate daily hire costs - Ticking this box will inform Chalkstring to calculate the ongoing daily costs for this fixed cost. This information is displayed on the 'Item' page of the Fixed costs menu. When ticking this box, two additional tick boxes will be displayed:
- Charged for public holidays - Tick this box if you will continue to be charged for the fixed cost during public holiday days set in the 'Fixed costs holidays' section of the 'Admin' menu. This informs Chalkstring to include public holiday days in it's daily calculations for this fixed cost..
- Charged for shutdowns - Tick this box if you will continue to be charged for the fixed cost during shutdown days set in the 'Fixed costs holidays' section of the 'Admin' menu. This informs Chalkstring to include shutdown days in it's daily calculations for this fixed cost.
Click 'Add to order' to save the order.
E. Columns
The columns shown in the table to be removed or new ones added by clicking this button.
F. Bill actions
- + Add fixed cost - Clicking this button will enable you to add a contingency fixed cost to the bill so it can be ordered. Contignency fixed costs are typically costs which weren't included at tender but are now required now the project is on site.
- Export fixed costs bill - This will export an excel sheet containing a breakdown of the fixed costs for this assessment. By default, these will be sorted by the ''Fixed cost type' on the spreadsheet.
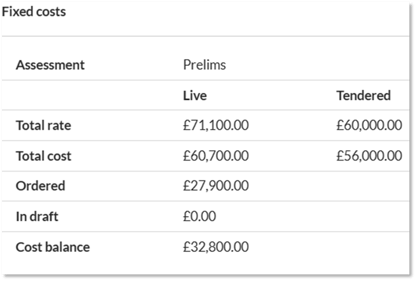
- Assessment summary - This will display a pop up window which provides a summary of the total values as they currently exist on the live project, and the values at tender
Draft orders
1. After entering the details of each fixed cost required, click on the ‘Orders’ sub menu.
2. All the fixed costs added from the ‘Fixed Costs Bill’ interface will display as separate draft orders for each supplier or contractor.
Fixed costs from the fixed costs bill will continue to be added to orders whilst they remain in the draft format status.
3. To see the order details, click on it.
When in draft format status, the order is allocated a unique order number. The status and summary of the order will display at the top of the page.
4. To update or edit an order, click the edit button in the top right corner.
5. Make any required changes and click ‘Save changes to order’ to save the details.
6. To commit to placing the order, from the order summary page, click ‘Confirm Order’ in the top right corner.
The confirm order details page
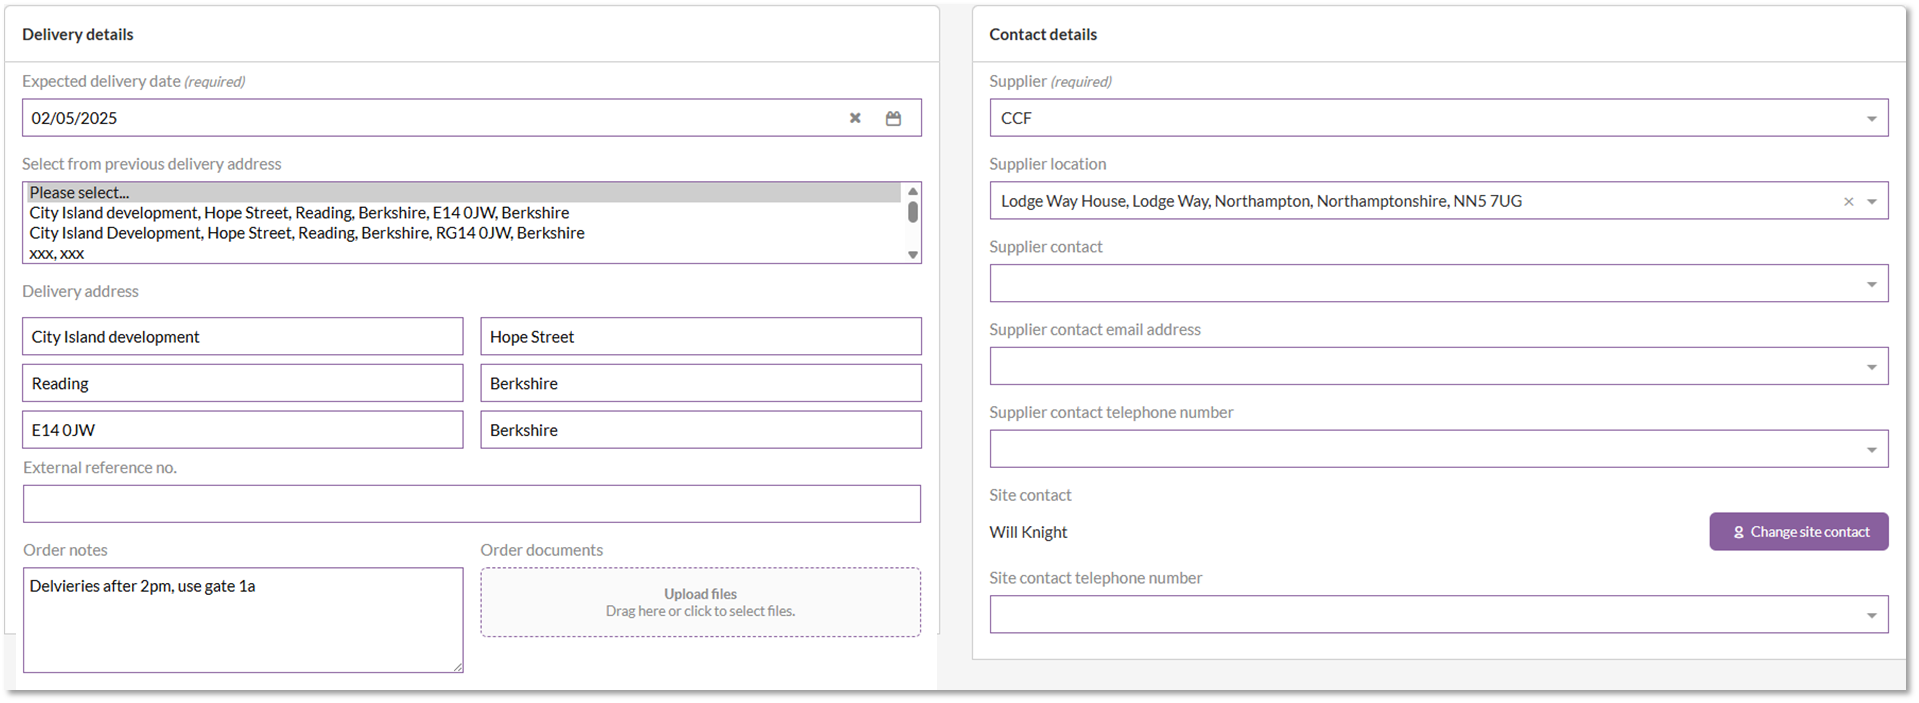
2. Once happy all the details are correct, click ‘Confirm Order’
3. The order status will switch from ‘draft’ to ‘held’. This will lock the order.
4. Click ‘Download draft order’ to generate a spreadsheet containing the order details. You will be given the option to add any order notes to the order at this point.
5. Email a copy of this spreadsheet to your supplier.
6. To confirm the order has been downloaded and sent to the supplier by email, click the ‘Mark as sent’ button in the top right of the order page.
The status of the order will update to ‘Sent’. The buttons in the top right corner will update to include ‘Add Invoice'. A new table will also become available at the bottom of the order page. This is used to track the invoices.
See KBA ‘How to add an invoice to an order’ for further details.
7. An order can be deleted by clicking the ‘Delete Order’ button.
Ensure the information has been communicated to your supplier that there is no longer a requirement and they have accepted the cancellation before deleting an order.
Orders will remain open until they are invoiced in full. After which they will become 'Approved'. This can be marked as complete if required by clicking the 'Mark as complete' button on the order summary page.
The order summary page
To see the summary details and cost details for a fixed cost, from the 'Orders' submenu, click the order.

Order summary
- Status - Displays the current status of the order
- Draft - Fixed costs have been added to an order but not confirmed.
- Held - Order has been confirmed but not marked as sent.
- Sent - Order has been sent to the supplier and marked as sent in Chalkstring.
- Partial - Some items have been marked as delivered against the order.
- Fulfilled - All items on the order have been marked as delivered.
- Approved - Order has been invoiced and marked as approved for payment.
- Cancelled - Order has been cancelled.
- Complete - Order has been marked as complete.
- Cost total - The current total costs for the fixed cost. This will update each time a new invoice is added to the cost, such as a monthly hire cost.
- Value delivered - Total value of any marked deliveries
- Total invoiced - Total value of any attached invoices.
- Approved to pay - Total which has been approved to you supplier for the order.
The edit order page
To update or edit an order, click the edit button in the top right corner of the order summary page.

A. Make any required changes to the order information fields.
B. To add another fixed cost to an existing order, click '+Add fixed cost' and select the required cost the pop up form. This form will only display the current fixed costs for the assessment. If you require a fixed cost from your database library which isn't already included in your assessment click '+Add fixed cost' in the top right corner of the 'Select fixed cost' window. If the fixed cost doesn't exist in your database at all, you need to create a brand new fixed cost click '+Add fixed cost' in the top right corner of the pop up form and complete the fields.
C. Clicking the bin icon will delete the fixed cost from the order and clicking the edit button will display a pop up window where the fixed cost details can be updated.
