How to complete the bill of quantities section of an assessment
In this article
- What is the bill of quantities?
- How to start the bill quantities
- The bill of quantities page
- How to add a sub-zone
- Want to know more?
What is the bill of quantities?
The bill of quantities section within Chalkstring is where the totals for each product are defined. The rate build-up product and price details are populated within the bill.
Zones can be set up to reflect how the project will be built, adding in dates for each zone will enable Chalkstring to track your time progress onsite. The quantities entered into the bill will be either taken from client bills, from your own measures of drawings manually or digitally, or by design software.
How to start the bill of quantities
1. Expand the main Chalkstring menu bar and click on the ‘Projects’ menu.
2. Click the project you are working on.
3. Click the work package you want to tender and click on 'Continue assessment'
4. This takes you to the 'Assessment Overview' page, from here click on 'Bill of quantities' in the top menu bar, or the '>' arrow in the 'Assessment overview 'section to navigate to the 'Bill of quantities' page.
The rate build-up section will need to have been completed prior to starting the bill of quantities.
The bill of quantities page

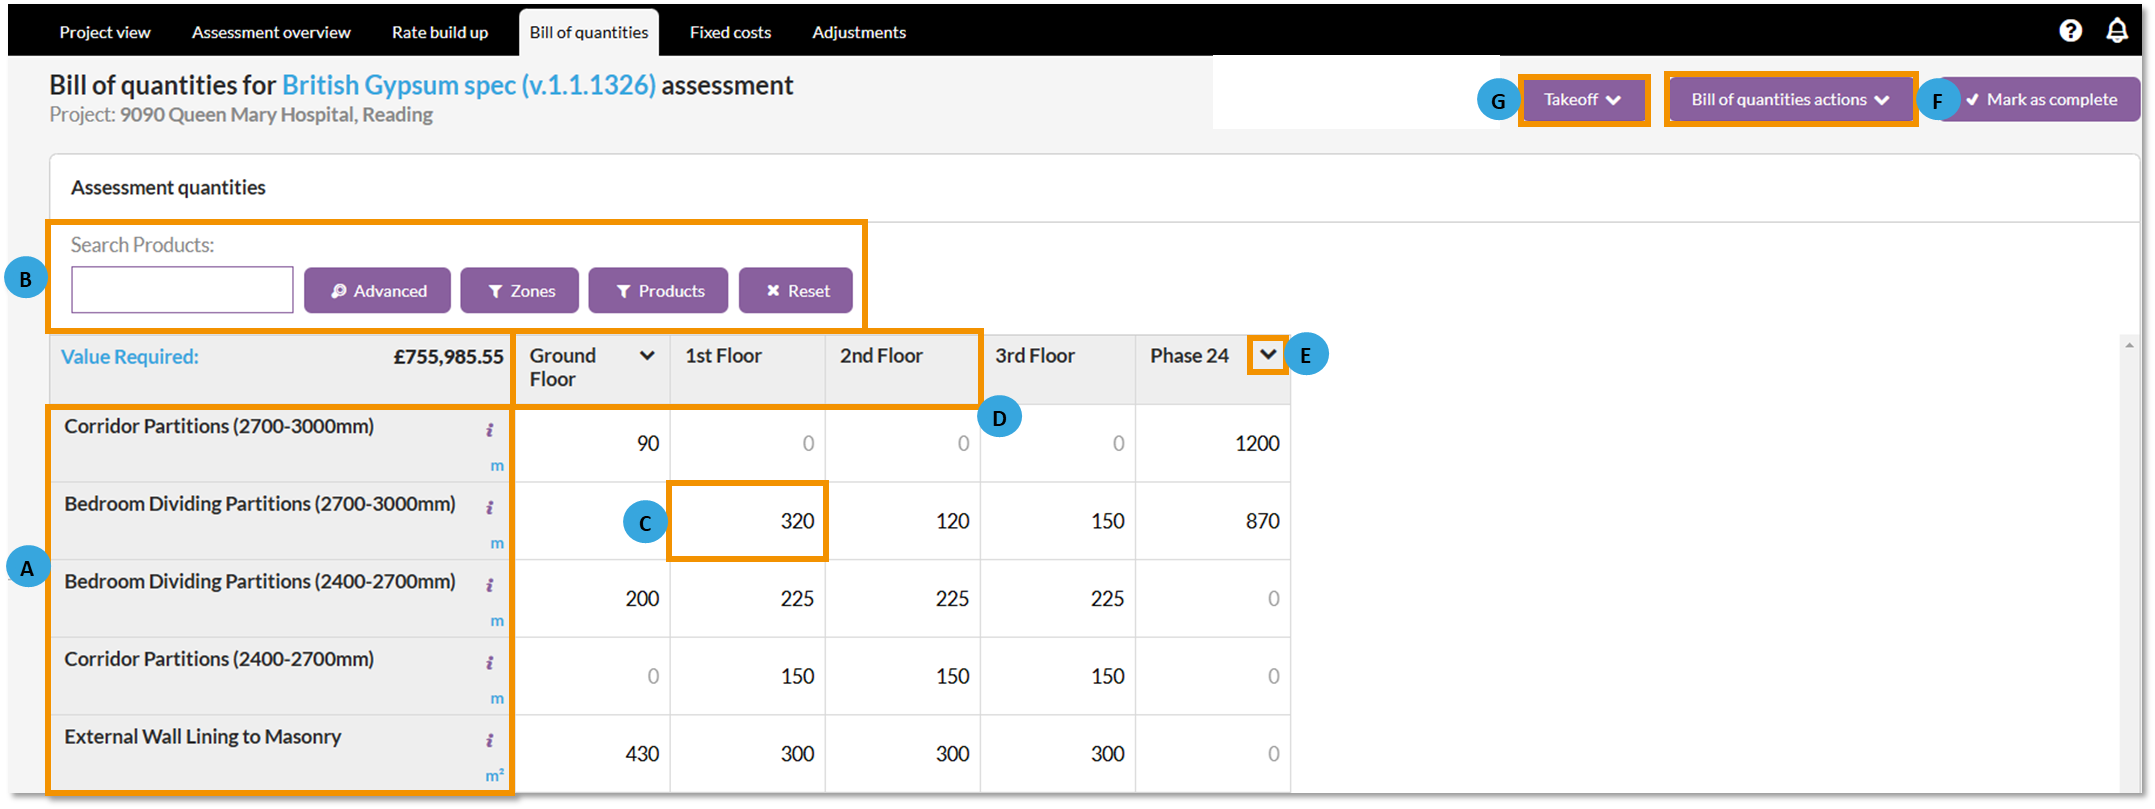
A. All products from your rate build-up will be listed along with their unit of measure, to see further details from the rate build-up, including prices, click the 'i' icon.
B. The search product filter can be used to find a specific product by name. Clicking advanced will provide additional advanced filter options. Clicking the 'Zones' or 'Products' filter buttons will allow filtering of the existing zones and products within the bill of quantities. Click the filter buttons, select the required products or zones you wish to view using the filters and click 'Apply selection' to apply your selected filters to the bill of quantities.
To select multiple zones or products, hold the ctrl button on your keyboard when clicking each item to add them to the filter.
D. The total package value and the totals for each zone can be viewed by hovering your mouse cursor over each zone name.
E. To delete a zone, move a zone, clone a zone, edit a zone name, zone description or amend zone dates, click the down arrow for the zone and select the required option.
When clicking 'Clone' to clone a zone, enter the zone count for the total number of cloned zones you wish to add to the bill of quantities. For example, to create 5 copies of the selected zone, enter '5' in the zone count box
For onsite assessments that have been set to lump sum, you cannot import a quantity of 0 for a product where a quantity existed for the product when the project was accepted and taken on site. Doing so will cause the import to error.
It's likely to only be able to allocate programme dates once the tender has been secured and the project is on-site. If this information has been provided tender, enter it now to establish an audit trail of contract programme dates.
The bill of quantities contains coloured flags to highlight the source of the quantity in each product for each zone.

- White cell = No quantity or quantity has been entered manually.
- Blue = The quantities have been populated from a drawing from the takeoff section of Chalkstring.
- Dark Pink = The quantities have been populated by using the client bill import.
- Green = The quantities have been populated by using export import feature on the bill of quantities page.
- Yellow = The quantities have been populated as a result of changing the on-site remeasure via the progress slider in the progress section of Chalkstring.
- Red = There is currently a discrepancy between the quantity shown in the bill of quantities and what is saved in the takeoff drawing.
- Purple = The quantities have been populated by linking this product to another. The 'parent' product automatically populates the quantity for any linked product
How to add a sub-zone
The ‘+ Add Sub-Zone’ function, provides the ability to sub-divide works down below the level which is used for tenders and applications for payment. Sub-zones are smaller areas within zones which can be used for internal purposes. These can help to manage progress more accurately and to help split out materials and labour with more granularity.
For example, a sub-zone may be an area between grid lines within a floor level zone or a specific room within a building.

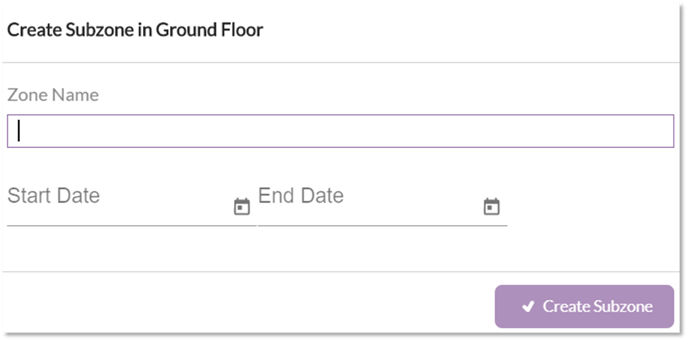
- Click on the down arrow of the zone name and click '+ Add sub-zone(s)'. Enter a name for the sub-zone.
- Enter any confirmed programme dates.
- Click ‘Create Subzone' to save it.
- To add multiple sub-zones, first create a single sub-zone and then select 'Clone' from the drop-down menu for the sub-zone. Enter the total number of sub-zones required in the 'Zone count' box.
Sub-zones are derived from the main zone, therefore sub-zone quantities MUST add up to make up the whole zone. If the quantities of all the sub-zones do not match the main zone total, Chalkstring will flag the whole zone as incomplete until quantities are balanced out.
Note: Subzones do not have access to the onsite function of projecting forward as part of applications for payment. If you will require the projecting forward functionality as part of your projects applications for payment, only use main zones when structuring your bill of quantities.