How to edit zones and add sub-zones in the bill of quantities
In this article
- Before you begin
- How to manually edit zones
- How to export and use excel to edit zones
- How to add a sub-zone
- How to delete zone or sub-zone in a pre-tendered assessment
- How to delete zone or sub-zone in a tendered onsite assessment
- Want to know more?
Before you begin
Assigning zones and sub-zones enables progress to be updated, materials quantified & ordered and labour defined & applied for with much higher accuracy.
It is advisable to undertake the updating of zoning process when the project transitions onto site, before recording progress or ordering materials.
Zones appear on both applications for payment and progress reports. Sub-zones do not appear on applications for payment but do appear on progress reports.
How to manually edit zones
1. Expand the main Chalkstring menu bar and click on the ‘Projects’ menu.
2. Search for and click the 'Project' you wish to edit the zones for.
3. Within the project homepage, click ‘Project hub’ sub menu.
4. Click on the sub menu for work package to be adjusted.
5. Click on the ‘Bill of Quantities’ sub menu.
6. To delete a zone, move a zone, clone a zone, edit a zone name, edit a zone description or amend zone dates, click the down arrow for the zone and select the required option.
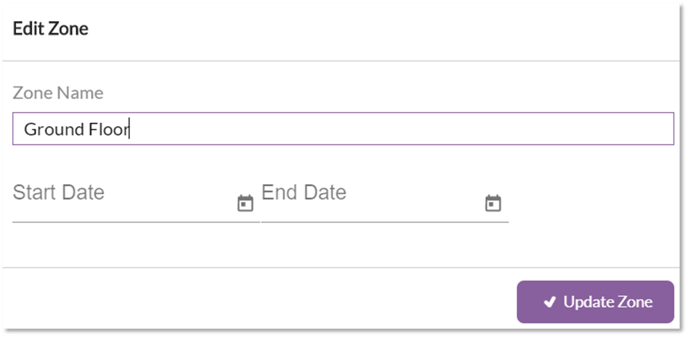
7. To update a zone name, click 'Edit' and update as required.
8. To update a zone description, click 'Edit' and update as required.
9. To update zone dates, click 'Edit' and update as required.
10. Click ‘Update Zone

For details on moving or cloning zones, see article 'How to compile the bill of quantities section of an assessment.'
The add sub-zone function provides the ability to further sub-divide project works to a level below what has been used for tenders and applications for payment.
Sub-zones are smaller areas within zones which can be used for internal purposes, to help manage progress more accurately. For example, a sub-zone may be an area between grid lines within a floor level zone, or even a specific room within a building.
Zoning and sub zoning should always be done before progress starts on site.
How to export and use excel to edit zones
All zones can be deleted by clicking 'Bill of quantities actions' and clicking 'Delete all zones'
How to add a sub-zone
The ‘+ Add sub-zone’ function, provides the ability to sub-divide works down below the level which is used for tenders and applications for payment. Sub-zones are smaller areas within zones which can be used for internal purposes. These can help to manage progress more accurately and to help split out materials and labour more granularity.
For example: a sub-zone may be an area between grid lines within a floor level zone or a specific room within a building.

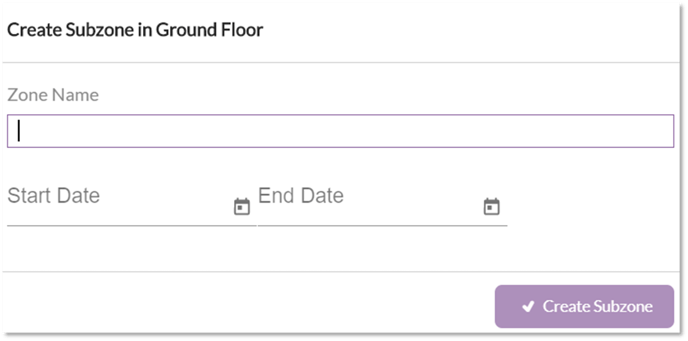
1. Click on the down arrow of the zone name and click '+ Add sub-zone(s)'. Enter a name for the sub-zone.
2. Enter any confirmed programme dates.
3. Click ‘Create Subzone' to save it.
4. To add multiple sub-zones, first create a single sub zone and then select 'Clone' from the drop-down menu for the sub-zone. Enter the total number of sub-zones required in the 'Zone count' box.
Note: Subzones do not have access to the onsite function of projecting forward as part of applications for payment. If you will require the projecting forward functionality as part of your projects applications for payment, only use main zones when structuring your bill of quantities.
How to delete zone or sub-zone in a pre-tendered assessment
Individual zones
1. Expand the main Chalkstring black menu bar and click on the ‘Projects’ menu.
2. Search for and click the 'Project' you wish to edit the zones for.
3. Within the project homepage, click ‘Project hub’ sub menu.
4. Click on the sub menu for work package to be adjusted.
5. Click on the ‘Bill of Quantities’ sub menu.
6. To delete a zone, click the down arrow for the zone and click 'Delete'.
7. Click ok to delete the zone.
All zones
1. Expand the main Chalkstring black menu bar and click on the ‘Projects’ menu.
2. Search for and click the 'Project' you wish to edit the zones for.
3. Within the project homepage, click ‘Project hub’ sub menu.
4. Click on the sub menu for work package to be adjusted.
5. Click on the ‘Bill of Quantities’ sub menu.
6. Navigate to the 'Bill of quantities actions' button in the top right corner and click 'Delete all zones'..
7. Click ok to delete all the zones.
Deleting zones cannot be undone, so only proceed if you are absolutely sure that you want to remove the zone(s) and any quantities they contain permanently.
How to delete zone or sub-zone in a tendered onsite assessment
We do not recommend deleting zones once an assessment has been tendered and taken onsite. Whilst it is possible to delete a zone from a project once it has been tendered, it is not advisable, as doing so may compromise data integrity.
For example, if a client takes an entire zone of work out of the scope of the project once onsite, the advised course of action is to zero the quantities for that zone, rather than delete it in its entirety. The zeroing of quantities will have the same commercial and operational effects, but it means Chalkstring maintains a record of the difference and why. Hard deleting will remove the data completely, which may be required to refer to at later date.
If you are sure you want to delete a zone, and the contact scope is set to 'Remeasure', complete the following steps.
1. Expand the main Chalkstring black menu bar and click on the ‘Projects’ menu.
2. Search for and click the 'Project' you want to edit the zone for.
3. Within the project homepage, click ‘Project hub’ sub menu.
4. Click on the sub menu for work package to be edited.
5. Click on the ‘Bill of Quantities’ sub menu.
6. Click on the cells which contain the data for the quantities and zones which are no longer requested and update them to ‘0’.
If the assessment has the contract scope set as 'Lump sum', you won't be able to update the quantity to 0 if the the product and zone had a quantity higher than 0 when the tender was accepted and taken onsite.
In the scenario where you want to change the onsite quantity to 0, we recommend to update the quantity to the smallest quantity possible instead. e.g. ‘0.001’.See article 'Lump sum considerations' for further details on lump sum assessments